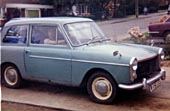
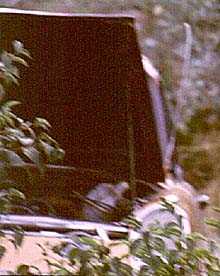
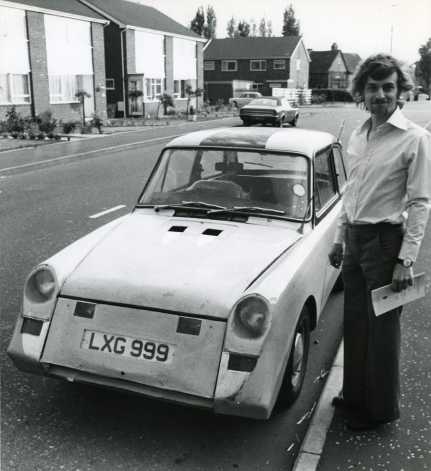
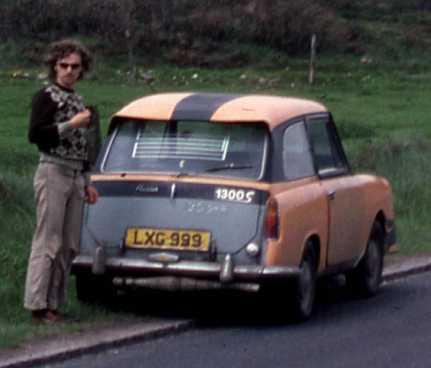
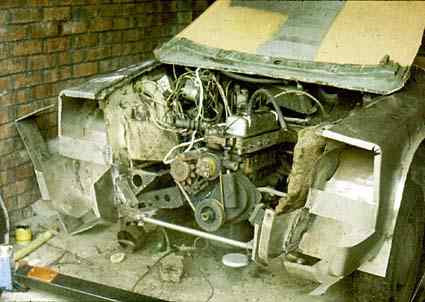
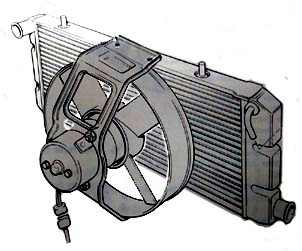
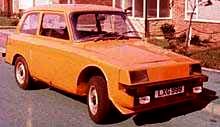
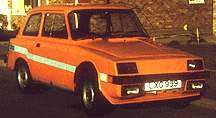
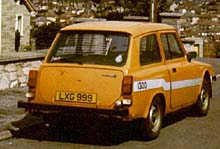
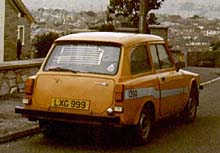
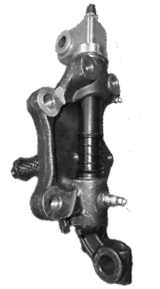
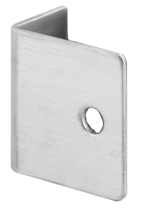
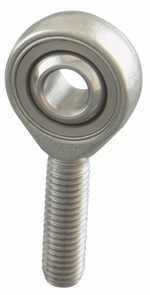
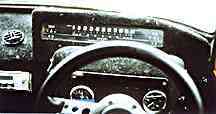
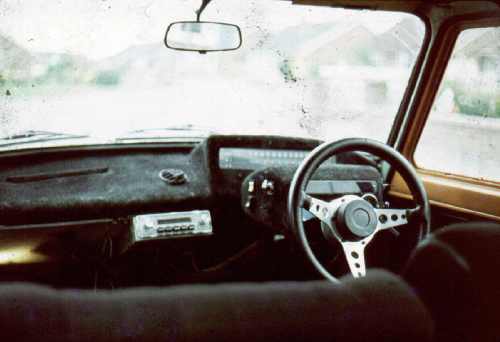
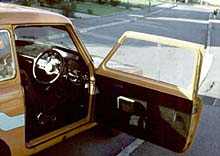
Modifying the Austin A40 Farina This was done before digital camera existed. I had the use of a 35mm film camera. Film and processing were expensive, consequently very few photos were taken in those days. The first love of my life was a 1960 Austin A40 Farina left to me by my grandfather. I inherited this car when I was 20 and it was 10. It was a very basic car with a 948cc BMC "A" series engine but it had the optional heater factory fitted! I had to add things like rear screen heater, mirrors, radio etc. I soon tired of the abysmal acceleration, which my grandfather had enjoyed during the nine years before his death, and I began to modify the car. Poor granddad would have turned in his grave! My first modification was to fit radial tyres instead of cross-ply. This made a big difference to the road-holding. The A40 seemed wonderful at the time but, of course, it was a cheap, horrible design which, by sheer luck, happened to have a drag factor of only 0.37 - a miracle in those days of "brick wall airflow" design when most cars boasted a drag factor of 0.6 on a good day. I began by increasing the engine power. I had it bored out to its maximum of 988cc and fitted a head from a Mini Cooper "S". A better silencer, "Howe" free flow exhaust manifold and twin S.U. carburettors pushed the power from 34 to 60 BHP. The small engine with twin 1.25" SU carburettors, high gearing (3.9:1 diff), free flow (Howe) exhaust manifold and gas-flowed head gave extremely good fuel economy. 40mpg was common around town with 60mpg on long journeys. My record was 72mpg driving from Coventry to Middlesbrough at 50mph one foggy night! (I'm referring to UK gallons, not American, which are slightly smaller. 1 uk gallon - 1.2 us gallons.) I added a brake servo unit and replaced the rear axle with one from a Ford Anglia because the original BMC axle now snapped half shafts too often. The Anglia axle was too narrow, even with wheel spacers added, and was quickly replaced by a Ford Cortina mk1 axle. Rear 7" drums were replaced with 9" drums from a Ford Corsair 2000 - See pictures of how this was done. (I photographed this work for a magazine article.) By this time the bodywork required "slight attention". Steel body panels were no longer available so I attempted to sort out the rusting body with a hacksaw and filler. This is the only photograph I can find of the early modifications. I had hand-painted the bodywork orange. I had used a hacksaw to cut off the rusting fronts of the wings and relocated the headlamp units further back with oval-shaped perspex covers. The front edge of the bonnet had also had the hacksaw treatment and the radiator grille had been replaced by a sheet of aluminium with a horizontal slot for cooling. Stop Press! I found another two photographs from 1976. By this time it had a flexible stainless steel exhaust system, which fell apart fairly quickly. I had also added an aluminium lip, which was pop-riveted to the rear of the roof and finished off with filler paste. In 1977 I sat down to sketch the way I thought it might look. Recently I discovered a photograph of the crumpled old sketch. Here it is: I replaced the rusting wings with ones that I made by hand out of sheet steel. At the time, I was working in a lock-up garage without electricity and had to do all the welding with two car accumulators that I carried home for recharging each night. Note the black plastic bumper at lower left. This was made from black rectangular-section "Marley" drainpipe with a spout glued to each end. Orange indicator lenses were screwed over holes where the bulbs were located. The "spouts" facing rearwards also had orange lenses so that the light was visible from the side/rear. This plastic bumper was fixed to a section of angle iron that I bolted to the existing bumper mounts on the car. Because of limitations in my own skill and available equipment, the body gradually changed shape and took on a (then) more modern look. I made a fold-down front out of fibreglass (with perspex headlight "windows") to allow easier access to the engine. The new box-section wings were filled with expanding brown foam to increase rigidity, decrease rust potential and give better shock absorption in the event of an accident. As I'd removed the front of the car, the front inner-wing panels were held by bolting two steel bars across. You can see the lower one in the photo. A crossflow radiator and header tank from an Austin Allegro was used. This radiator comes with a thermostat switch and electric fan so the original fan was removed from the water pump pulley. The radiator has two mounting pins, top and bottom. I welded steel tabs to the two new steel bars that I'd bolted across the front of the car. Each tab was drilled and fitted with a rubber grommet, into which the radiator mounting pins fitted. A friend sprayed the whole car bright orange. Front headlights were recessed behind perspex and Austin Allegro foglights were added below. Wind-up door windows were replaced with sliding perspex. I found some plastic channel that was just the right size and glued it into the door at the top and bottom. Black bumpers were made out of Marley drainpipe with indicator repeater lights built into the end "spouts" using orange Perspex. Also a home-made fibreglass "spoiler" beneath. I added the pale blue stripe with an aerosol spray. This picture shows the actual colour - bright! Door handles were removed and replaced with custom recessed sliding mechanisms, so obscure that locks were not needed. I used a wooden mould and thin black PVC plastic to create a "soap dish" with a slot at each end. Then a strip of PVC was fed through and attached to the lock mechanism. The strip had a half-inch finger hole, which disappeared into the door when released. It could be "walked back" into sight by finger pressure and pulling. Nobody could figure out how to open them - not even the police who stopped me at least once a week for a "routine check." Rear lights were replaced with "Rubbolite" units normally used on lorries. The LXG999 number plate is original. These lights were very dim until I sprayed the internal black rubber with silver paint. Sick of carrying two spare wheels, I used front disc brakes from an Austin Healey Sprite and fitted them with Ford studs to take Ford wheels all round. The brake master cylinder came from a Mini Cooper "S" and was a split system which fed the rear 9" Ford drum brakes from one side and the front discs via a Mini Cooper "S" vacuum servo unit. This gave the best all-round balance. (I tried feeding the servo to both front and rear with a Mini pressure limiter valve in the rear line but the rear brakes either locked when I was alone in the car or failed to slow the car if I had passengers!) I tried telescopic rear shock absorbers from a MkII but they were dreadful. Luckily, I was offered a pair of adjustable Armstrong lever shock absorbers from a racing Midget. These worked nicely. The final power unit was a Marina 1.3 engine bored out to 1340cc and developing 80 BHP (still with twin 1.25" SU carburettors for economy). I grafted in an MGB GT gearbox which required considerable cutting and welding inside the car. I had to make my own engine backplate and modify the propshaft. I had written to "Cars and Car Conversions" magazine for advice on doing this. By the time their reply arrived ("sorry, it's impossible") I had already completed it. See complete details of how this was done as published in "Hot Car" magazine. A panhard rod across the rear axle and adjustable lever shock absorbers from a racing Midget sorted out the rear suspension. The front suspension wishbones were retained with king pin swivels but I added a triangulating top suspension rose-jointed arm to take the strain off the lever shock absorbers which themselves had MGB-GT valves and hypoy 140 gear oil inside! Unfortunately, I have no photos of the front suspension modifications, which is a pity because, in my opinion, this was THE most important modification that anyone can do, since it stabilises the steering and prevents the "where's it gonna go when it lands?" sensation if you drive too quickly over a bumpy road. So I'll try to describe in words: At the top of the king pin assembly is a horizontal bolt, which secures the shock absorber arm (not shown in photo). I welded another bolt to this bolt, head-to-head, and ground down the weld so that a spanner would still fit on the hexagon. I made a steel bracket and welded it to the inner wing so that the hole in the bracket aligned exactly with the pivot point of the shock absorber. Edit: I don't recall whether I used a bracket like this or whether I simply welded a strengthening plate on the vertical next to the shock absorber. (Sorry, but it was decades ago!) I took thick-walled steel tube, cut it to the appropriate length* and tapped a thread in each end to accept a rose joint (knuckle joint). The rose-jointed tube was then attached to this bracket and to the welded bolt. *The new rod must effectively be a mirror image of the shock absorber arm so that the king pin assembly is free to move up and down, vertically, but the triangulation prevents it from flexing forwards or backwards. The end result is much improved steering accuracy, especially when the car bounces on a rough road. I also replaced the old, rusty, spring-loaded tubes on the king pin with a single PVC tube from a plumber's shop. I sealed this in place with silicone. See below for notes about grease. The interior was heavily soundproofed with felt, foam and thick rubber sheet. It was very quiet inside. I moulded the dashboard out of fibreglass and covered it with black nylon fibres (flock). I had to design and build a high voltage (30kV) generator to achieve this. Speedometer came from an Austin 1300. Front seats were from a Lada, as were the dashboard air vents. Rear seat was re-covered in black nylon to match. Performance was not exceptional since I built this car with economy in mind. Top speed was a little over 100mph and fuel economy was typically 40mpg if I didn't drive it too hard. Acceleration was about 12 seconds 0 - 60. An improvement on the original 25 seconds from the old 948cc 34BHP engine! Now, if you own one of these cars there are TWO things you must do to make it last: 1. The BMC engine is not renowned for strength and fitting a steel bar across the centre main bearing cap does not stop the crank from snapping (as I found out one miserable, cold, wet night near Thirsk). To get the best life out of the engine, use FULLY SYNTHETIC ENGINE OIL. You can change it every 10,000 miles so it's really good value for money. If you value your engine DO USE THIS OIL. I've used it in my last three cars and it really makes a big difference to the life of the engine. 2. The front suspension King Pins rust very quickly if you use the wrong grease. This is because "LM" grease often used is actually "high melting point" grease intended for wheel bearings that run hot. It contains a "lithium soap" base which quickly absorbs moisture and MUST NOT be used for slow-moving parts such as King Pins and ball joints. The original Austin A30 manual specified Hypoy 140 gear oil. This is fine but it runs out quickly. The best stuff I found for King Pins and ball joints (even the "sealed for life" type) is "STP" or "Wynns" Oil Treatment. It's like treacle. Put it in a grease gun and pump it into the King Pins every 3 months and under the rubber seal of the ball joints every year. They will last forever. :o) For Insurance List of modifications to Austin AAO Farina Mk I Notes The modifications to steering and suspension have been made in order to strengthen the system. These modifications have not significantly altered the manufacturer's original suspension geometry, steering geometry, or ride height. The modifications to the braking system have been made in order to improve the efficiency and reliability of the system, in order to cope with the increased engine power. The modifications to the bodywork have been made in order to replace rusted original sections and thereby strengthen the structure. Where fibreglass panels have been used, these panels are in no way load-bearing structures. This list is provided, in good faith, to enable the Insurers to assess the 'risk'. Any omissions from this list are unintentional. 13th May, 1978. This list supersedes any previous list. Please note that no changes have been made to the engine and transmission since the previous list was provided. CAR: Austin A40 Farina Mk I Engine: M G Midget capacity 1293 cc Compression ratio: 10 : 1 Camshaft: 88G229 Head: 12G1805 (AEG 585) Distributor: Marina. 1.3 type Flywheel: Marina. 1.3 type Clutch: KGB GT 8.5" diaphragm type Carburation: Twin 1.25" S.U. 'swing-needle' type (Spitfire 1300) Engine backplate: Custom 3/8" mild steel fabrication. Gearbox: MGB GT type. Propshaft: MGB GT type Special fabrication; MGB GT / Anglia 105E Rear axle: Ford Cortina Mk I type Diff ratio: 3.9 : 1 Springs: A35 van leafspring type Shock absorbers: Armstrong adjustable lever type Panhard rod: Simca 1301 type. Fabricated mountings welded in position Front suspension: Standard with uprated, shock absorbers and additional pivoted upper link arm. Braking system: Dual master cylinder; export Mini type. Front: Servo-assisted M G Midget type 8.25" disc assemblies Rear: Direct with pressure limit valve; Ford Capri 9" drums Handbrake: Standard rod and cable acting on rear drums Bodywork: Front wings: steel welded construction: foam-filled. Bumpers: Hollow-section black plastic bolted to steel angle, Boot lid: Fibreglass double skin construction; foam filled. Radiator panel: Fibreglass moulding with perspex headlamp covers. Front lip spoiler: Fibreglass moulding. Lights: Headlamps: Wipac Quadoptic with integral sidelight. Front foglights: Allegro type; 55 Watt halogen. Front indicators: Bumper-mounted; early Ford Escort type. Rear indicators and brake lights: Rubolite type 60/O1. Rear fog lights: red, Rubolite type 60/12. Reversing lights: white, Rubolite type 60/10. Exhaust manifold: Three branch (LOB) Ancillaries Radiator: Austin Allegro 1300 type. Cooling fan: Electric, thermostatically operated. Alternator: Smiths Prestolite 45 Amp. Oil cooler: MGB GT type. Wiper motors:- Front: two-speed Marina 1.3 type. Rear: A40 front type. Horn: Fiamm twin air horns. Wheels: Ford Cortina Mk II 4" type. Tyres: 155 - 13" radials. Windscreen wipers: Fiat 124 type. Washers: Electrically operated, front and rear. Speedometer: Austin 1100 type. Speedo. cable: A35 van type. Door windows: Horizontally sliding. Door locks: Standard; solenoid operated. Battery: Triumph Herald. Steering wheel: Astrali, 14" diameter. Exhaust system: Stainless steel fabricated system. Heater: Special exhaust manifold heat exchanger system. Heater fan: Triumph 2000 type. Front seats: DAF 44 reclining type. Wheel trims: Later Ford Escort type, (plastic) Back to My Cars Version 1.4 updated on August 6, 2015 Version 1.5 updated February 19, 2024 (added Allegro radiator pic.) Send this page address - CLICK HERE - to a friend !
Back to
Index 

August 1976 - Medway
However, it looked disastrous so I gave it some thought and decided on a complete rebuild. 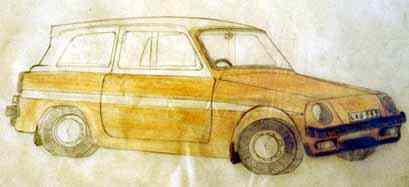

(Do not leave the stuff in the grease gun - it seeps out and makes a mess). If you really MUST use grease then get Castrol CL which is the correct grease for king pins and ball joints. Do NOT use CL for wheel or propshaft bearings!
Sadly, I scrapped the A40 on its 21st birthday after an unsuccessful attemp to convert the rear suspension to coil springs. I transferred the engine to a Vauxhall Chevette. (Actually, the coil spring conversion was mechanically successful but it increased the road noise by an unbearable amount.)