|
| ||||||||||
|
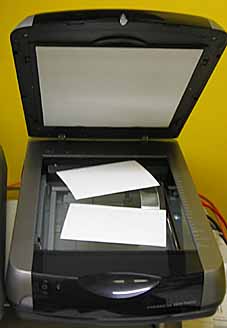
 Next to the [Scan] button click on the smaller [^] arrows button to see the "File Save Settings" window. You can select the filename start characters, the start number, the file and compression type and the destination folder. Clean the glass with a moist cotton cloth. Place the 35mm frame on the glass. Put the (up to) eight slides in the frame. They will be scanned in the order indicated (1 to 8 beginning far right). Any missing slides will not be scanned and be ignored in the numbering sequence. To scan 35mm slides select "Positive Film" under Document Type. If it's not an option, check the overhead lamp connector at the rear of the scanner. Switch the scanner power off then on. Relaunch EPSON Scan. Eventually the option will appear if you do this enough times! Normally I scan in "Home Mode" with a "Other" resolution of 1200dpi and a Target Size of 4 x 6 in. A smaller resolution is fine if you just want images for a web site. A larger resolution is desirable if you plan to make an A4 print - but scanning will take hours! So 1200 is a reasonable compromise to get "postcard size" prints and for archiving family snaps. Next to the Preview button select "Thumbnail" and the preview scan will locate and select all eight images automatically, regardless of orientation. If it can't, select "Normal" instead and Preview again. Manually define each image and also set the Target Size to 4x6 in., while that image is selected, for each one. When you've set all eight images, press [cmd] [A] or click the (All) button on the left of the Preview screen to select them all. Now when you click [Scan], it will scan and save each one automatically as before. It will also remember the selections and settings until you Quit or select "Thumbnails" again. This is handy unless you have a mix of portrait and landscape, of poor exposure quality, in which case you'll have to select the images manually each time. Normally, however, with images of correct exposure, the scanner is perfectly capable of recognising them automatically in "Thumbnail" mode. What many people don't know is that it can also recognise photographs in the same way. Not only that but it doesn't matter if the photos are correctly aligned. Replace the white pressure pad in the "lid". Simply toss a few photos onto the glass - make sure there's at least a 10mm gap between them. Select "Photograph" as the Document type and select "•Thumbnail" next to the "Preview" button. Then click "Preview" and the scanner will find the exact edges and align the photographs so, after scanning, they will be perfectly aligned and saved individually! Upgrading to Leopard and scanner won't work? Did you have a previous version of Epson Scan installed on OS 10.4.x? If so, did you completely remove this driver before upgrading to OS 10.5? If you had an older version of Epson Scan installed, locate the original driver files for this driver and run the uninstaller to remove the files. Do not use any other version of Epson Scan to do this. You must use the driver uninstaller included with the driver that you installed on 10.4.x; do not use the uninstaller from the driver you installed on OS 10.5. Once this step is completed, then use the Find tool to remove any remaining files. Enter "Epson Scan" and "Perfection 4180" as your Search keywords. After all remaining files have been deleted, use the same process to remove the new driver you installed on 10.5. Then reinstall the latest driver for 10.5. Once installed run the standalone Epson Scan utility to verify that the driver works. Important Note: If you installed OS 10.5 on a separate partition (volume) from 10.4, make sure to remove all Epson Scan files from each partition before performing a reinstall. Epson drivers to download: The code for Photoshop CS3 was written to run natively on Intel-based Macintosh (Mactel) computers. Intel-native code improves performance over the previous non-native versions of Photoshop on Intel-based Macintosh computers. Printer drivers, scanner drivers, and plug-ins which have not been updated to run natively on Intel-based Macintosh computers may not work properly with Adobe Photoshop CS3. Please try to do the following to resolve this issue:- Run Photoshop CS3 in Rosetta. 1. Select the Adobe Photoshop CS3 icon. 2. Press Cmd-I to Get Info. 3. Select Open Using Rosetta, and close the Info window. 4. Start Photoshop That was the error message which interrupted my work flow today. I tried everything from deleting and reinstalling "Epson Scan" to swapping the scanner and connecting lead. Nothing helped. After scanning a few pages of a magazine to PDF, the scanner would stop and the error message would appear. Of course I found the cause eventually. You'll never guess! My Hard Drive was down to its last 60MB of space. A Word of Warning! Most people san slides with the intention of throwing them away to save space. But your computer files are very vulnerable! To minimise the risk of loss, it is essential to keep copies of your scanned images on more than one Hard Drive stored in more than one building. You could use "Cloud Storage" in addition (not instead). You can also store on other media such as memory sticks, DVD discs, etc. but all of these are less reliable than a Hard Drive and should be used in addition, not instead. Created February 16, 2006 | ||||||||||
| Send this page address - CLICK HERE - to a friend ! | ||||||||||