|
| ||||||||||||
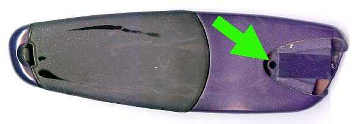
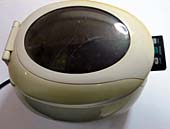
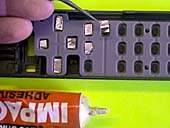
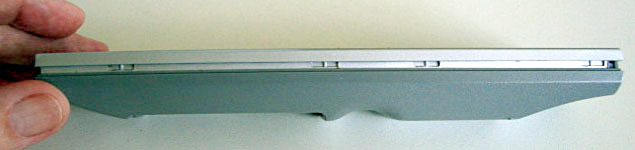
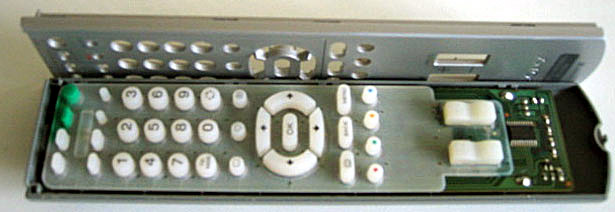
| How can I repair my remote control handset? How can I repair my zapper? Fix my zapper. Fix my remote. My sky remote. Note: UK Sky Digibox remotes incorporate a second "universal" function to operate a TV set for volume and channel numbers (and not much else). You have to enter a code for your specific TV set. This code has NO effect on the normal operation of the Digibox handset with the Digibox. If the remote won't work, click HERE. If that page doesn't help and you think your remote is faulty, read on. Front Panel Film Most new equipment arrives with a plastic protective film on the front panel. REMOVE THIS! As it heats up and ages, it passes infra-red light less readily. It also tends to diffuse it. So GET RID. Batteries First, fit new batteries of the correct type. You'd be amazed how many people think batteries last for years. They don't - especially if the remote has been left squashed between cushions all night with the buttons depressed! If new batteries don't help, test the remote on a neighbour's equipment of the same type (if possible) or look at the remote through a digital camera LCD screen while you push buttons - you'll see the infra-red LED flashing. If so, then your remote is probably OK. Most TV repair shops will test your remote control for free or at very low cost. Or try holding it next to a transistor radio which is tuned off-station (just a hiss). If you can hear the remote pulsing when you push a button, this tells you that at least part of the circuit is working (although the infra-red LED may not be). If you hear nothing from the detuned radio, the remote control is probably faulty. You can buy a replacement high power infra-red LED HERE. One common cause of problems is that the equipment itself is receiving a "blocking" signal from elsewhere. For example, the front panel may be in bright sunlight or there may be a flickering lamp nearby (switch off all fluorescent and "energy saving" lamps to begin with). Close the curtains. Also make sure that there isn't another remote control in the room. It may be squashed between cushions or under a book and transmitting continuously if a button is held down. For equipment such as a Sky Digibox, which can receive remote commands via its 2nd RF output socket, make sure that socket is NOT connected to anything. If that cures the problem then you know that the interference was getting into the Digibox that way. It may have been interference from the TV set getting directly into the cable (use double-shielded cable) or it may be something in the room where the remote "eye" is located. Go to that room and check everything suggested in the previous paragraph. Remotes do have a limited life, and I personally don't know of many remote controls older than about 8-10 years that are still working perfectly. You can repair some types of remote control, but once you start taking them apart, you should really be thinking about replacing the remote control before it stops completely. It's a good idea to buy a low-cost limited-function remote to use every day and keep the original safe for those occasions when you need to use the special functions. The buttons which wear out are usually off/on, 1, 2, 3, up, down, forward, backward, OK and volume. A low cost remote with just the basic functions will save wear and tear on your original expensive remote. There are two main types of keypad: 1. Silicone rubber with conductive buttons moulded in. You can not usually repair type 2. If the internal printed circuit board is cracked you can sometimes repair it. If the copper tracks are cracked you can usually solder fine bridging wires across. If the black conductive epoxy tracks are cracked then you can't repair them. In addition, if somebody has already "had a go", the remote is probably damaged beyond repair. Can I repair it myself? You may be able to. I'll tell you some "trade secrets" and you can decide for yourself. As I mentioned earlier, the plastic membrane type is usually not repairable because the contacts are sealed between two layers of plastic film. However, the type that uses a flexible silicone rubber moulded contact keypad is often repairable. This is how you do it: You will need the following: Remove any screws which hold the remote control moulded shells together. (Usually in the battery compartment. Sometimes hidden by labels). Some remotes (eg. Sky) have a cross-head screw hidden inside the lens compartment. If it doesn't come apart easily, there may be moulded clips holding the two shells. Later Sky remotes have a Torx screw. Use the hairdryer to get the plastic case as warm as possible. This makes it more flexible. Now twist it in your hands and see where the split line is. You should be able to insert a small penknife blade or putty knife and gently lift the plastic shell away from the clips. Work carefully around the perimeter with the blade. The battery compartment is often the weakest point if the moulding is very narrow at the corners. Take extra care here or you will break it! Once the two shells are apart you can see the printed circuit board, which contains the components. There are copper tracks insulated with green epoxy resin and, either conductive black resin contacts, or gold-plated contacts. Against the contact side of the board is the silicone rubber keypad moulding. The tips of the buttons contain conductive powder which is designed to connect the board contact pairs together electrically when pressed into contact. There are four main failure modes: If the copper tracks are cracked it is sometimes possible to scrape the green epoxy coating away and to solder very fine wire to the shiny copper beneath. This is a skilled job. You use a single hair-thick strand from multi-strand flexible wire. A 1mm tip is needed for the soldering iron and 0.4mm solder. If the crack is extensive (more than 2 tracks affected) then the repair is unlikely to be reliable in use but it's only your time that might be wasted so go ahead. If the conductive resin is cracked it is usually impossible to carry out a reliable repair, although sometimes a temporary repair can be made with silver-loaded paint (used for repairing car rear winscreen heaters). If you get the remote to work like this, immediately use it to program a "learning remote" then store the repaired one away for emergencies only. This is worthwhile only if the original remote is unobtainable or substantially more expensive than the "learning remote". Contamination should be washed from the printed circuit board and from the silicone rubber keypad by scrubbing with a toothbrush and a little nail polish remover. This is a mixture of acetone and water. Isopropyl Alcohol can also be used. (Car windscreen de-icer is a mixture of isopropanol and water). Keep nail varnish remover (acetone) away from plastic and protect your eyes and clothing. It can also be harmful to the skin so read the warnings on the bottle. Dry the parts with the hair dryer to remove all moisture. Do NOT touch the cleaned contacts with your fingers! If the plastic case is contaminated, wash it with warm water and detergent then dry it thoroughly. It's also possible to use a low-cost ultrasonic cleaning bath with isopropyl alcohol or windscreen de-icer. Remove batteries and allow plenty of time to dry out. If the button tips are worn out (you'll find the most-used buttons still don't work reliably) then repair may not be possible. One method that we find successful is to take a strip of aluminium cooking foil. Now, handle it only with tweezers and cut it into tiny pieces. Glue a piece to each button tip with an impact adhesive. Put just a tiny smear of glue on the button tip. Finally, check the printed circuit board for damaged solder joints and loose connections. A favourite problem is that the little 455 kHz resonator breaks. Another is that the infra-red LED stops working. Another is that the battery contacts break away from the soldered joint OR they corrode. In the latter case you must clean them. A toothbrush and toothpaste might do (wash and dry thoroughly). Finally, coat the battery contacts with silicone grease to keep the connection corrosion-free. Search for your replacement TV/VCR remote here. Sony remote info donated by "braychurchmouse". Getting into remote controller RM-X800 for Sony Freeview remote VTX-D800U Ok let me first confirm there are no securing screws. The top is secured to the bottom by means of 4 lugs each side and two at the bottom. The lugs are about 8mm long and the centres lie at (measured from the top) 1cm, 7 cms, 10.5 cms and 17.5 cms. The two at the bottom are centred at 1cm in from each side. As I mentioned before, I had tried separating the two bits first with a screw driver but this looked as though it would damage the plastic before making any progress. The technique that worked was to use a plastic credit card (use an old one because it caused a bit of delamination on mine). I managed to get it in between the two parts, half way down the side and then by running it along it detached the lugs. There didn't seem any way of flexing the lugs in to disengage so you just have to persevere with the credit card. Once I had got the top off, it was apparent that the buttons were all on a single plastic membrane, which could be easily lifted off. On the base of each button was a dark pad, which, according to glodark, is actually a metalic powder. Underneath the two faulty buttons on the black pads and on the suface of the printed circuit was a nasty sticky substance (bl**dy kids!). I managed to gently wipe this off with a very dilute soapy solution and then finish off with some isopropyl alcohol. I just used a cloth for this but then used a toothbrush to clean inside the button moulding. I put the membrane back over the printed circuit and tested to buttons...absolutely fine, so I then reassembled the two halves by gently pressing the halves together starting with the two at the top and working down. © Glodark 2008 - 2020 | ||||||||||||
| Send this page address - CLICK HERE - to a friend ! | ||||||||||||